Sunday, April 8, 2018

ISA #2: Create a six frame full colour storyboard

For this next assignment you will digitally storyboard a (minimum of) six frame sequence of your own choosing. You are very welcome to create a storyboard longer than six frames.

You have the option to:

1.) write your own script - any subject is fine so long as it involves 'live action' human-proportioned characters. Cartoony characters will not be acceptable.

OR

2.) choose a sequence from a favourite book, film, video game cut scene or TV show - so long as it involves 'live action' human-proportioned characters. NOTE: If you choose an existing film, video game or TV show sequence, it is OK to use screen grabs as 'photo reference.'

Whether you choose option 1 or 2, your initial presentation on your next blog entry should be a b/w thumbnail version of your board. Some years ago I used to do what's known as "shooting boards" for a British TV commercial director named John O'Hagan. Below is a series of sketches John did for me at the start of one of our projects, for a TV commercial he was going to shoot for British Telecom (BT).


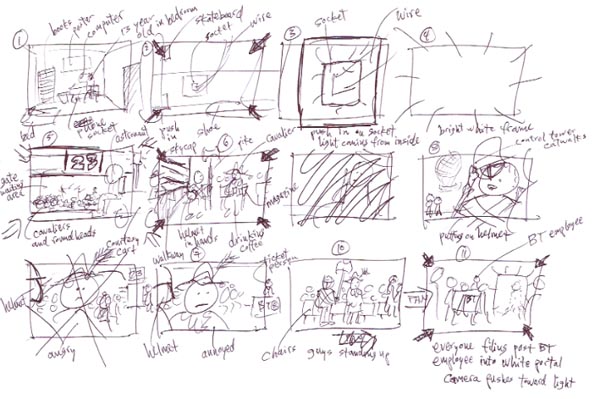
Start your sketching process by creating a similar roughly sketched board (including hand written director's notes), using John's example as your guide. Post this sequence on your blog, explaining what you are working on.

Next, using digital drawing and painting techniques to show both line art and shading in grey scale, create a more developed version of the initial thumbnails, like the first page of this sequence I sketched for John after looking at his rough sketches.


Use the three hours we would normally be in class tonight to do your initial stick figure thumbnail board, then spend the week resketching the sequence as per my example.

Post both sequences on your blog, along with some written description of your process by the start of our class in Week Nine. Upload the link to your post to the Week09 dropbox.


Tuesday, April 3, 2018

Storyboarding a TV Commercial, Part 4

Last time you digitally sketched thumbnails based on the revised script. You would have begun with a series of linear drawings (of thumbnail quality) and added grey values afterwards. Based on my recent demo in class, redo your thumbnails using a grey tones painting process, blocking in shapes rather than focusing on linear details. For example:


Now use these 'painted' thumbnails to begin building the full colour final version. Choose any one frame that appeals to you and block in the biggest shapes in colour, working from back to front. Leave the thumbnail on a Multiply payer with reduced opacity to help guide your colour block-in:


Add assets like trees and other mid-ground props on separate layers so you have the flexibility to move them around, lighten or darken them, duplicate them or resize them.


You can save these as separate files for later use on other frames - or even other future jobs.


Add a Multiply layer for shading foreground elements...


... followed by additional layers for details like facial features and clothing details, and then finally a highlights layer.


As a finishing touch I gathered together the mid-ground layers (trees, Grim, and the recycling bin) and applied a Gaussian Blur filter to them. This heightens the sense of 'film making' - suggesting the scene was shot with a short focus lens.

For next week, choose just ONE frame from your painted thumbnail sequence and use this method to paint the full colour finished version. Post screen shot steps, explaining your process as you go - just as I've done above. Include your Photoshop desktop as you can see in my shots.